Baking with TezSign
Overview
This guide covers how to configure TezSign (hardware signer) to work seamlessly with TezBake. It assumes you’re setting up your hardware signer on the same machine as your baking machine, as part of an all-in-one setup. You do not have to use TezBake to setup TezSign; instead you can use the helper app.
- Security First: TezSign ensures your baking keys remain secure on hardware and never leave the device.
ℹ️ INFO
TezSign is provided without any guarantee. Use it at your own risk.
Prerequisites
- TezBake installed — TezBake must be set up on your baking machine before integrating TezSign
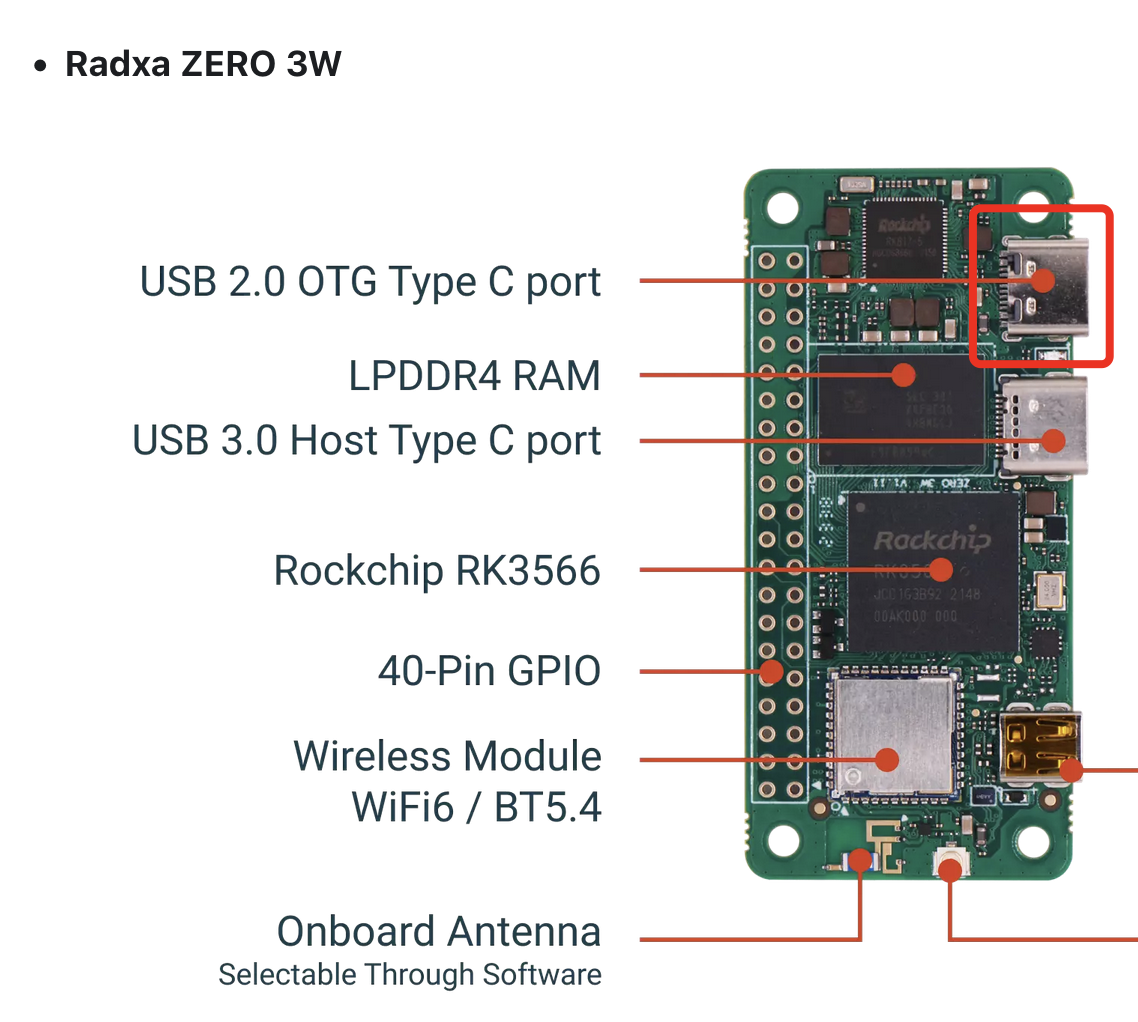
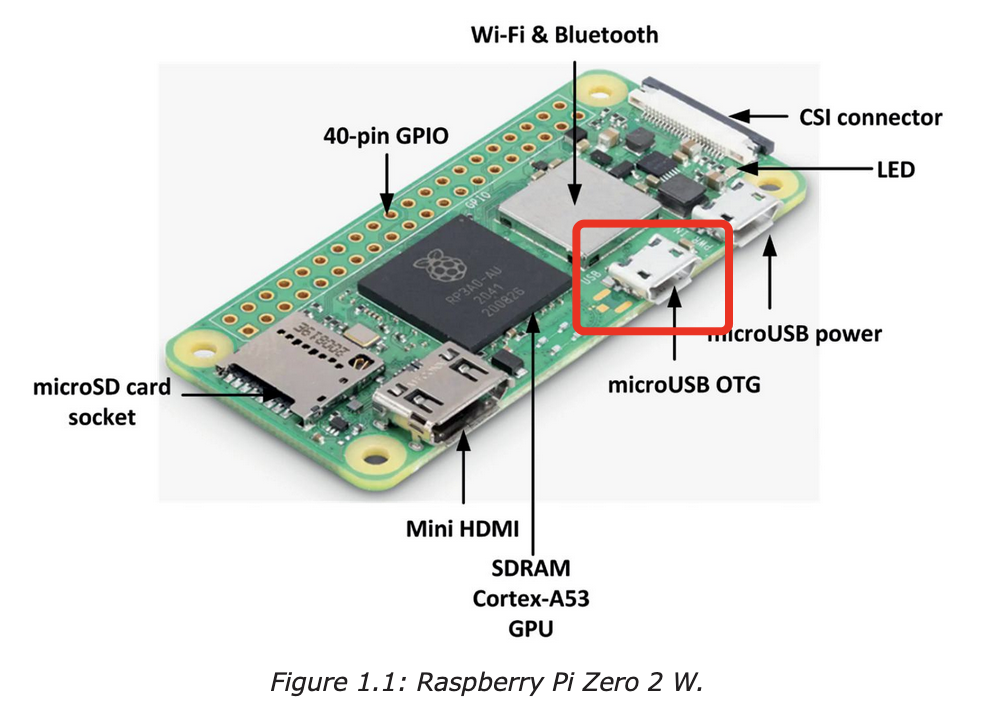
- A supported TezSign hardware device — Radxa Zero 3W or Raspberry Pi Zero 2W (see shopping list in Phase 0)
- SD card(s) — at least 8GB, enterprise/endurance grade recommended; buy 3 (one active, one clone, one spare)
- USB cable — a short, high-quality data cable to connect TezSign to your baking machine
Table of Contents
- Phase 0: Purchase SBC and image SD card
- Phase 1: Baker Configuration
- Phase 2: Device Preparation
- Phase 3: Node Configuration
- Phase 4: Verify and Bake
- Advanced: Direct TezSign Backend
- Advanced: Automatic Unlock for TezSign
Phase 0: Purchase SBC and image SD card
Generally speaking, the Radxa Zero 3 (the lowest available configuration) as well as the Raspberry Pi Zero 2W are great choices for your TezSign setup. Purchase 2 devices if you worry about the possibility of downtime if your SBC fails. Also purchase multiple SD cards. It’s good to have at least 3 SD cards: one for baking, one for backup of your baking SD card and one spare to replace a failed card. 8GB SD cards will do just fine. Ensure you are getting the “enterprise” or “endurance” versions if possible.
Sample shopping lists
General Supplies (for both RPi and Radxa)
- Dual Micro SD Card Reader (2 slots) - For easy SD card cloning and backups. Having two slots allows direct card-to-card cloning without intermediate steps. https://a.co/d/iOrBvk6 or similar dual-slot reader.
- High-endurance Micro SD Cards (8GB+) - Get at least 3: one for baking, one backup clone, one spare. Samsung PRO Endurance or SanDisk Max Endurance or similar recommended.
Radxa Zero 3
- Radxa ZERO 3W RK3566 4-core CPU SBC, GPU, NPU, HDMI with 1080P Output, and WiFi 6 & BT 5.4, Single Board Computer https://www.aliexpress.us/item/3256807428419499.html?gatewayAdapt=glo2usa4itemAdapt
- Radxa Heatsink 5519A, Designed for Radxa ZERO 3W / 3E, Easy to Install and Remove. https://www.aliexpress.us/item/3256806829446736.html?gatewayAdapt=glo2usa4itemAdapt
- USB A to USB C Cable 10Gbps Data Transfer and 60W 3A Fast Charging Cable USBC 3.1/3.2 Cable https://www.aliexpress.us/item/3256805660336073.html?spm=a2g0o.productlist.main.11.31ce63d3dP4ICu
- OPTIONAL: micro HDMI to HDMI cable https://www.walmart.com/ip/Micro-USB-to-HDMI-Cable-Micro-USB-to-HDMI-Adapters-Black-E7Z3/10094271646 or some equivalent micro HDMI dongle or cable for your setup. Buy this only if you want to see what the screen of your TezSign gadget is showing, for development or curiosity purposes.
- OPTIONAL: Radxa Power PD 30W https://radxa.com/products/accessories/power-pd-30w/ An independent power source to the device has been shown to resolve certain edge cases where the OTG USB power does not provide consistent power. A powered USB hub can also be used.
Raspberry Pi Zero 2W
- Raspberry Pi Zero 2 W (add case & heatsink) https://www.pishop.us/product/raspberry-pi-zero-2-w/
- CableCreation Short Micro USB Cable, USB to Micro USB 24 AWG Triple Shielded Fast Charger Cable, Compatible with PS5/PS4, Raspberry Pi Zero, Chromecast, Phone, 0.5FT/6 inch Black https://www.amazon.com/CableCreation-Charger-Compatible-Chromecast-Android/dp/B013G4EAEI
- OPTIONAL: mini HDMI to HDMI cable https://www.walmart.com/ip/4K-HDMI-2-0-Cable-6ft-High-Speed-18Gbps-Mini-HDMI-HDMI-Cable-4K-60Hz-HDR-3D-2160P-1080P-Ethernet-Braided-Cord-32AWG-Audio-Return-ARC-Compatible-MacBo/14899622631 or some equivalent mini HDMI dongle or cable for your setup. Buy this only if you want to see what the screen of your TezSign gadget is showing, for development or curiosity purposes.
- OPTIONAL: Raspberry Pi power supply https://www.canakit.com/raspberry-pi-adapter-power-supply-2-5a.html An independent power source to the device has been shown to resolve certain edge cases where the OTG USB power does not provide consistent power. A powered USB hub can also be used.
Download gadget image and flash SD card
Navigate to the release page and download the latest image for your RPI or Radxa device: TezSign Releases
Once downloaded, extract the image. The image will be around 1.5GB - 2GB once it’s been extracted.
Use Balena Etcher (or a tool you are familiar with) to flash the gadget image to your SD card.
Once done, plug in the SD card into your gadget and connect it to your baking computer with just a single USB cable. A separate power source is not required. Use the data connection USB port (OTG port), not the power connection USB port.
-
On the Radxa, connect to the farthest USB port
-
On the Rasberry Pi Zero, connect to the USB port between the power USB port and the mini HDMI port.
Phase 1: Baker Configuration
1. Install Latest TezBake
TezSign support is now available in the latest version of TezBake.
wget -q https://bake.tez.capital/install -O /tmp/install.sh && sudo sh /tmp/install.sh
Upgrade the instance to ensure all packages are up to date:
tezbake upgrade
2. Initialize the TezSign setup
Initialize the signer configuration. This creates the /bake-buddy/signer/tezsign.config.hjson file and runs TezBake’s side TezSign setup.
tezbake setup-tezsign --init --platform
ℹ️ INFO: You typically do not need to modify the generated configuration file unless you are managing multiple devices or have specific advanced requirements.
Phase 2: Device Preparation
🖥️ WHERE: Separate Trusted Machine (Recommended)
It’s highly recommended to complete this step on a clean machine separate from your TezBake baking machine for maximum security. If that’s not an option, your baking machine is acceptable.
Why separate? A machine that doesn’t browse the internet or download applications has a lower risk of compromise. Your baking machine with only TezBake installed is often safer than a daily driver machine.
When using a separate setup machine, download the companion app: TezSign Releases (filename starts with tezsign-host-)
When using TezBake itself to setup your TezSign gadget, use tezbake tezsign * commands directly—the companion app is already included (no separate download needed).
Command examples are provided for both the companion app and TezBake.
1. Initialize device
Before being able to initialize the device you must enable your computer to see the device via USB. Download the udev rules and install them. Then add your user to the right group to access the device.
curl -fsSL https://raw.githubusercontent.com/tez-capital/tezsign/refs/heads/main/tools/add_udev_rules.sh | sudo bash
sudo usermod -aG plugdev $USER
⚠️ Ubuntu Username Issue
Ubuntu does not allow capital letters in usernames.
Log out and log back in to make sure the new settings are effective.
Connect your TezSign device to your workstation or baker and run:
# PLEASE NOTE YOU WILL BE USING EITHER THE TOP COMMAND OR THE BOTTOM COMMAND DEPENDING WHERE YOU'RE SETTING UP THE GADGET
#
# Using companion app
./tezsign-host init
# Using TezBake
tezbake tezsign init
🚨 CRITICAL: Master Password
You will be prompted to set a Master Password. Choose this carefully.
IMPORTANT:
- The Master Password CANNOT be changed later
- Save your Master Password somewhere safe
- This is the ONLY way to access your TezSign keys
- Loss of this password means permanent loss of access to your keys
2. Generate your baking keys directly on the device
Generate your baking keys directly on the hardware. In this example, we will generate keys for Consensus and DAL (i.e., companion key).
# PLEASE NOTE YOU WILL BE USING EITHER THE TOP COMMAND OR THE BOTTOM COMMAND DEPENDING WHERE YOU'RE SETTING UP THE GADGET
#
# Using companion app
./tezsign-host new consensus companion
# Using TezBake
tezbake tezsign new consensus companion
In this example, we generate two keys named “consensus” and “companion”. You can create as many as you need.
ℹ️ Understanding DAL Keys:
For baking with the Data Availability Layer (DAL), two distinct tz4 keys are required:
- Consensus key - Used for block validation
- Companion key - Used for DAL operations
💡 TIP: Backup Your SD Card
Now that your keys are on the TezSign device, use Balena Etcher or similar tool to clone the SD card. This backup will allow you to quickly recover if your original SD card fails.
Phase 3: Node Configuration
🖥️ WHERE: Your Baker Machine
All commands in Phase 3 and beyond run on your TezBake baker machine. Plug your TezSign device into this machine now.
1. Enable USB Access on the Baking Machine
Before the baking machine can communicate with your TezSign gadget, you must install the udev rules and add your user to the correct group.
curl -fsSL https://raw.githubusercontent.com/tez-capital/tezsign/refs/heads/main/tools/add_udev_rules.sh | sudo bash
sudo usermod -aG plugdev $USER
Log out and log back in to apply the group membership changes.
ℹ️ INFO: This step is required on any machine that will communicate with the TezSign device, including your baking machine.
2. Import Keys to TezBake client
Link the keys stored on your TezSign device to TezBake’s configuration using local aliases.
Depending on the context of your setup, you will determine how to name your TezSign wallet aliases within TezBake itself.
When you’re first switching to a new consensus key or to tz4 baking, you will already have a key called baker. This is the default key that always gets used in TezBake. In addition to this key, you will also import your consensus and companion keys, from TezSign. Once you are actively using your TezSign keys, you can then import the consensus key as the baker key as described below.
If you’re already baking using tz4 keys, it’s recommended to alias your consensus key on the TezSign signer to the baker key.
The desired end stake of your TezBake signing experience is to use baker for consensus and to use the TezSign backend directly (see below). This way there are no missing keys reported by tezbake info. You need to ensure the migration to this desired state is performed one step at a time, respecting the in-between states.
Syntax:
tezbake setup-tezsign --import-key=<tezsign key alias> --key-alias=<octez key alias> [--force]
Example (Importing the Consensus and Companion Keys) – IF MIGRATING TO BLS/tz4:
tezbake setup-tezsign --import-key=consensus --key-alias=consensus
tezbake setup-tezsign --import-key=companion --key-alias=companion
Example (Importing the Consensus and Companion Keys – IF ALREADY ON BLS/tz4:
tezbake setup-tezsign --import-key=consensus --key-alias=baker
tezbake setup-tezsign --import-key=companion --key-alias=companion
⚠️ WARNING:
- Ensure your
--key-aliasdoes not conflict with existing keys you wish to keep- Use the
--forceflag only if you intend to overwrite an existing alias
3. Import Keys to TezBake node and signer
To bake with multiple keys (e.g., separate keys for consensus and DAL), you must register them as key aliases in the node configuration.
⚠️ DEPRECATED: The file-based method (
additional_key_aliases.list) is deprecated. Use the CLI commands below instead. See Key Aliases for the full reference.
IF MIGRATING TO BLS/tz4:
As per the example we used consensus and companion, add both aliases:
tezbake node modify --set configuration.additional_key_aliases '["consensus","companion"]'
NOTE: Later on when your
consensuskey activates you can reimport it underbakeralias (the default one) with--force. Then you can remove consensus from additional keys:tezbake node modify --remove configuration.additional_key_aliases '"consensus"'NOTE: Only the import alias from
--key-alias=<THIS ALIAS>is relevant. The internal tezsign alias can differ.
IF ALREADY ON BLS/TZ4:
tezbake node modify --set configuration.additional_key_aliases '["companion"]'
The consensus key is not listed because it’s the default assumed baking key by TezBake
4. Retrieve Public Keys & Proofs & Register them on the chain
⚠️ WARNING: Testing & Power Considerations
Testing Period: It’s highly recommended to setup TezSign, activate it on the blockchain, and wait 3 cycles to ensure stability before relying on it for production baking.
Power Issues: In some cases, connecting the TezSign gadget only via the OTG USB port may not provide consistent power, causing the device to go offline. Solutions:
- Use the dedicated power port on your gadget for independent power (most reliable)
- Use a powered USB hub on the OTG USB port
- Configure BIOS USB power settings (see below)
BIOS USB Settings to Check:
- USB power delivery in Soft Off state (S5): Enabled
- ErP Ready / EuP Ready / ErP Compliance: Disabled
- Deep S4/S5 / Deep Power Saving / Pseudo G3: Disabled
- Resume by USB Device / Power On by USB: Enabled
These settings prevent your USB port from entering power-saving mode and shutting down the TezSign gadget.
⚠️ USB 3.0 (xHCI) Compatibility Issues
TezSign USB gadget mode may have issues with USB 3.0 (xHCI) controllers. Symptoms include:
error -110(timeout) orerror -62(device not accepting address) indmesg- Device gets no power or doesn’t boot
- Device never appears in
lsusb- 5-second timeout errors
Solutions (try in order):
Check your USB cable - A faulty or low-quality cable is a common cause of these errors. Try a different cable, preferably a short, high-quality data cable (not a charge-only cable). The cables in the shopping lists above are tested and recommended.
Use a USB 2.0 port if your machine has one (check
lspci | grep -i usbfor EHCI)Use a USB 2.0 hub (NOT 3.0) between host and TezSign device—this forces USB 2.0 negotiation
BIOS settings (especially for Intel NUC):
- Disable “xHCI Mode” or set to “Auto”
- Disable “USB Power Saving” / “USB Suspend”
- Enable “Legacy USB Support”
- Set USB port power to “Always On”
To enter BIOS from Linux:
sudo systemctl reboot --firmware-setup
- USB Reset Command if device stops responding:
tezbake tezsign advanced usb-port-reset
tezbake stop --signer && tezbake start --signer
To register your keys on-chain (via TezGov or octez-client), you need the Public Key (BLpk) and the Proof of Possession (PoP)
tezbake tezsign status --full
The easiest way to activate your newly generated keys is by using the TezGov web portal. Connect with your manager Ledger or similar and within the Baker Management area, set your consensus and companion key details. You will need your BLpk’s, first, and after filling them out, the prompt will ask you for your PoP’s.
⏱️ Key Activation Timeline
After registering your keys on-chain, they will activate in 3 cycles (~3 days). You can verify the activation status:
- On TzKT:
https://tzkt.io/<your_tz1_address>/secondary-keys- Via CLI:
tezbake info --signerYour old keys remain active until the new ones take over. Do not remove or change your old signing setup until the new keys are confirmed active.
Bakers must now set their new consensus and companion keys together when changing to tz4 signing at first. Later down the road, you will be able to only rotate your consensus key if so desired. The companion key is a must for tz4 BLS signing, to perform the DAL-related duties. When you see “companion,” think “DAL.” Consensus and companion always go together.
Registering using the CLI is somewhat more challenging and no longer recommended but possible.
Here’s an example to fill in your own details, assuming you have your baker manager wallet imported as baker (this is no longer recommended, you should have your consensus key imported as baker and manage your baker parameters with <gov.tez.capital>):
tezbake signer client set consensus key for baker to consensus --consensus-key-pop BLsig9xyDJ29WjExJgRAvPXrD5u46aTn1uEmrhz12VKXtrUSzP34FCqgUF56L3otpzB1kLuzUCaLk2tzT2309GKLDgj209jeslkjes3mr43590jfgLKDJd09j3092jLKDFJnlksjodijF3
tezbake signer client set companion key for baker to companion --companion-key-pop BLsig9xyDJ29WjExJgRAvPXrD5u46aTn1uEmrhz12VKXtrUSzP34FCqgUF56L3otpzB1kLuzUCaLk2tzT2309GKLDgj209jeslkjes3mr43590jfgLKDJd09j3092jLKDFJnlksjodijF3
5. Reconfigure
tezbake upgrade
Phase 4: Verify and Bake
1. Restart Services
Restart your setup to apply changes.
tezbake stop && tezbake start
2. Check Status
Check that TezBake sees your new keys:
tezbake info
If your keys appear in the info output, you are ready to bake!
3. Unlock
tezbake tezsign unlock
Select both keys and input the passphrase you chose when initializing the device.
You can check the lock/unlock status of your TezSign keys
tezbake tezsign status
🚨 CRITICAL: Unlock Before Baking
Ensure your TezSign device is unlocked before baking with your new keys.
IMPORTANT:
tezbake infocan only detect a locked TezSign device if you’re running in Advanced: Direct TezSign Backend mode. Until you switch to that mode, always run both commands:
tezbake tezsign status- Check lock/unlock statustezbake info- Check general baker status
Advanced: Direct TezSign Backend
⚠️ WARNING: Timing Matters
Avoid switching to the TezSign backend during the initial transition phase. To ensure a seamless transition:
- Continue using the default backend initially
- Wait until you fully rely on tz4 TezSign keys
- Then safely switch to the TezSign backend
You can configure TezBake to bake directly through the TezSign backend, bypassing the standard octez-signer.
Before: <octez-node><octez-signer><tezsign>
After: <octez-node><tezsign>
This setup offers slightly faster execution and lower latency by directly utilizing TezSign’s hardware capabilities.
How to Enable:
- Open the signer configuration file:
/bake-buddy/signer/app.json - Add
BACKEND: tezsigninside theconfigurationblock:
// ...
       "configuration": {
           "BACKEND": "tezsign"
       },
// ...
- Apply the changes:
tezbake upgrade --signer
- Restart the service:
tezbake stop --signer && tezbake start --signer
To Revert:: Remove the BACKEND line from app.json, upgrade, and restart.
Advanced: Automatic Unlock for TezSign
You can configure TezSign to unlock automatically by securely storing the device password.
Steps to Enable Automatic Unlock
- Run the following command to set and store the password:
tezbake setup-tezsign --password
This will prompt you to enter the password for your TezSign device.
To unset the automatic unlock, simply set an empty password when prompted.
- Apply the changes by upgrading the configuration:
tezbake upgrade --signer
- Restart if Required
tezbake stop && tezbake start
Disaster Recovery & Failover
Backup Your SD Card
After successful setup, immediately clone your SD card:
Using Balena Etcher (recommended):
- Select “Clone Drive”
- Choose source SD card → destination SD card
- Store backup in a safe location
Using dd:
sudo dd if=/dev/sdX of=/path/to/backup.img bs=4M status=progress
💡 TIP: Keep at least 2 backup SD cards. Data on the card is encrypted with your master password, so clones are safe to store.
If Your TezSign Device Fails
- Have a backup SD card ready - Insert your cloned card into a spare device
- Never run two devices with the same keys simultaneously - This causes double-signing and slashing
- If no backup exists, use your manager Ledger via TezGov to set a new consensus key (takes 3 cycles to activate)
Recommended Redundancy
- 2 TezSign devices (one active, one backup)
- 2+ cloned SD cards
- Test backup periodically by booting on backup device (with primary unplugged)
Related Guides
Getting Started:
- Baking on Mainnet - Main baking setup guide
- Best Practices - Hardware and operational recommendations
After Setup:
- Monitoring Logs and Status - Monitor your baker
- Troubleshooting - Common issues and solutions
- TezPay Setup - Automate reward payments
Command Cheatsheet
| Task | Command Example |
|---|---|
| Initialize TezSign Platform | tezbake setup-tezsign --init --platform |
| Initialize Device | tezbake tezsign init |
| Generate New Keys | tezbake tezsign new <key-name-1> <key-name-2> |
| Import Key to TezBake | tezbake setup-tezsign --import-key=<tezsign-alias> --key-alias=<alias> |
| Verify Keys | tezbake info |
Any questions/comments/concerns? Please contact the Tez Capital team on Discord or Telegram